If you’re running a WooCommerce store, integrating Stripe Apple Pay on WooCommerce can be a game-changer for your business. This easy payment method not only enhances the checkout experience but also significantly boosts conversion rates and reduces cart abandonment. In today's competitive eCommerce landscape, offering fast, secure, and mobile-friendly payment options is important to keeping customers engaged and improving sales.
With millions of Apple users preferring Apple Pay for its ease of use and security, enabling Stripe Apple Pay on WooCommerce ensures that your store caters to modern shopping preferences. In this in-depth guide, we’ll take you step by step through the process of setting up Stripe Apple Pay on WooCommerce, ensuring your customers enjoy a smooth and hassle-free checkout.
Additionally, we’ll help you troubleshoot common Apple Pay issues in WooCommerce, so you can resolve any setup challenges effortlessly. Lastly, we’ll introduce Rasonix, a leading web development company, that specializes in WooCommerce optimization, helping businesses like yours enhance their online stores for better performance, user experience, and higher sales.
How to Set Up Stripe Apple Pay on WooCommerce
Here are the steps to install and setup Apple Pay on WooCommerce
Step 1: Install the Stripe for WooCommerce Plugin
Before you begin, make sure you create a WooCommerce website on WordPress. Stripe is one of the most reliable payment gateways available, and integrating it into your store will allow you to accept multiple payment options, including Apple Pay.
1. Log in to your WordPress dashboard using your admin credentials.
2. Locate Plugins and search for Stripe For WooCommerce.
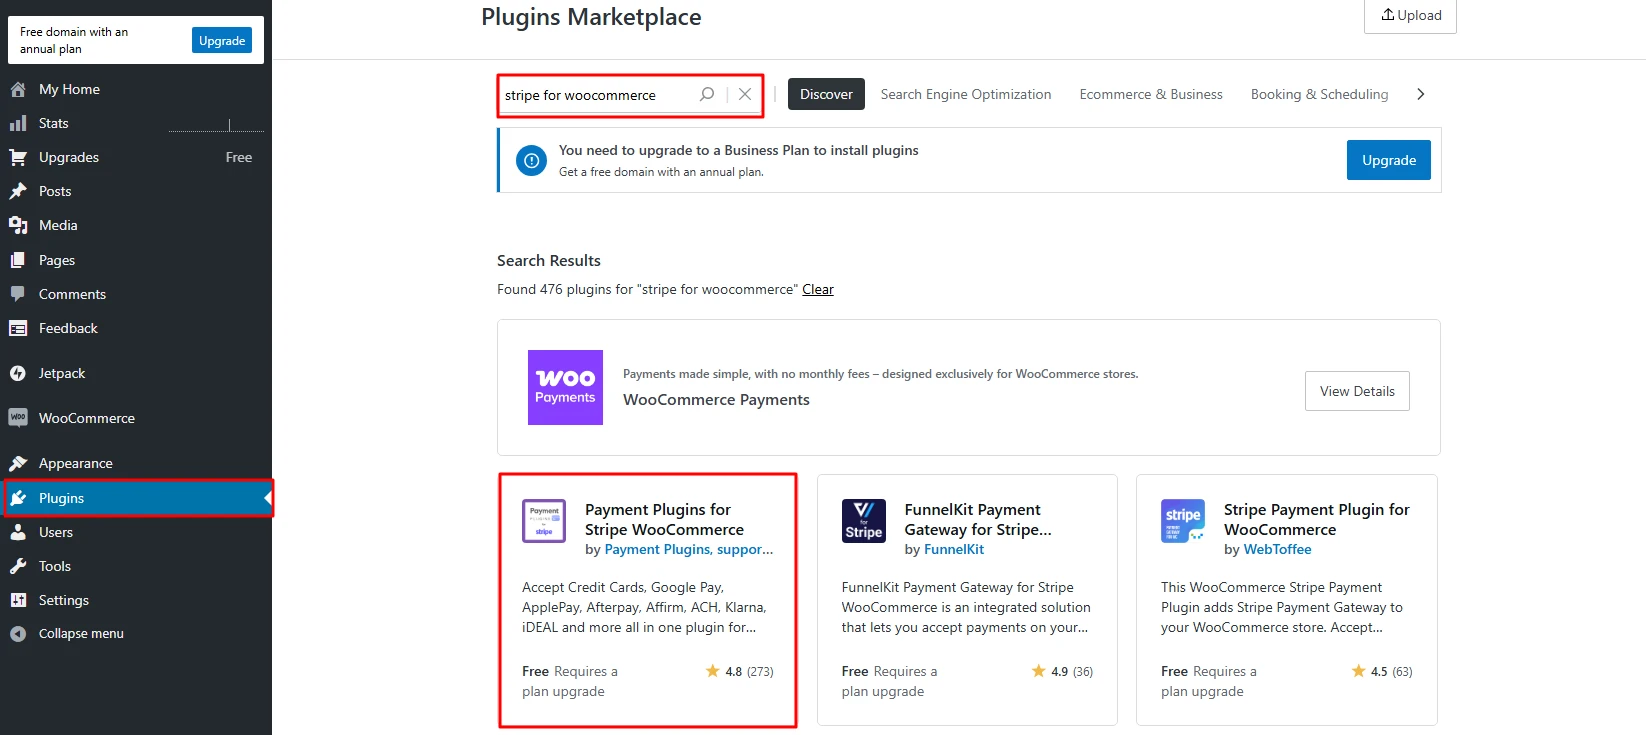
3. Look for the official plugin developed by WooCommerce or a trusted third-party developer.
4. Click “Install Now” once you find the correct plugin. After installation, click Activate to enable it.
Now, Stripe is successfully added to your WooCommerce store. The next step is to connect your Stripe account to your website.
Step 2: Connect Stripe to WooCommerce
Now that the Stripe plugin is active, you need to integrate it with your Stripe account to start accepting payments.
1. Go to WooCommerce > Settings > Payments from your WordPress dashboard.
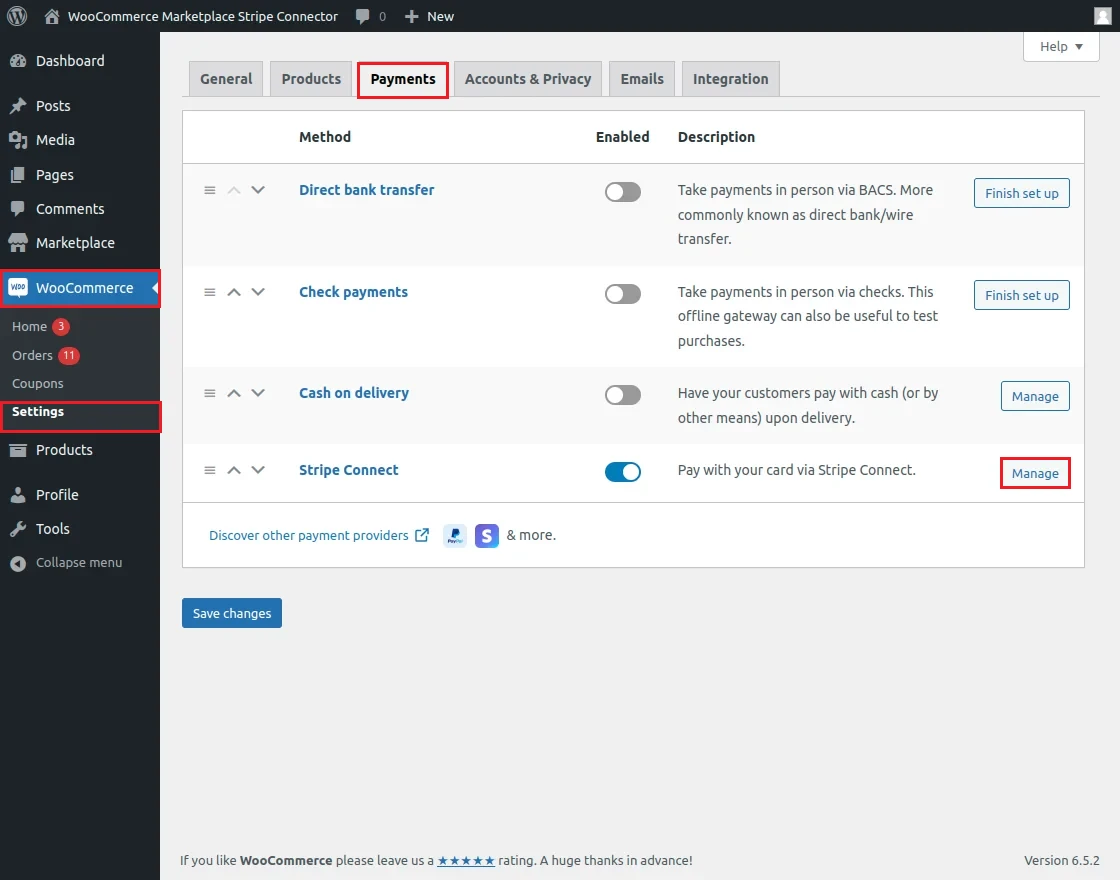
2. Locate Stripe in the list of available payment methods and click the Manage button.
3. Log in to your Stripe account in a separate tab. If you don’t have a Stripe account yet, you can create one at Stripe.com.
4. Retrieve your Live Publishable Key and Live Secret Key from your Stripe Dashboard. You can find these keys under Developers > API Keys in your Stripe settings.
5. Copy and paste these keys into the corresponding fields in your WooCommerce settings.
6. Click Save Changes to finalize the integration.
At this point, your WooCommerce store is connected to Stripe, allowing you to accept credit and debit card payments. However, Apple Pay is not enabled by default, you’ll need to activate it separately.
Step 3: Enable Apple Pay on Stripe
Apple Pay is a fast and secure payment method that allows customers to checkout easily with a single tap. To enable it, follow these steps:
1. Log in to your Stripe Dashboard.
2. Navigate to Settings > Payment Methods.
3. Find Apple Pay in the list of available payment options and toggle the switch to enable it.
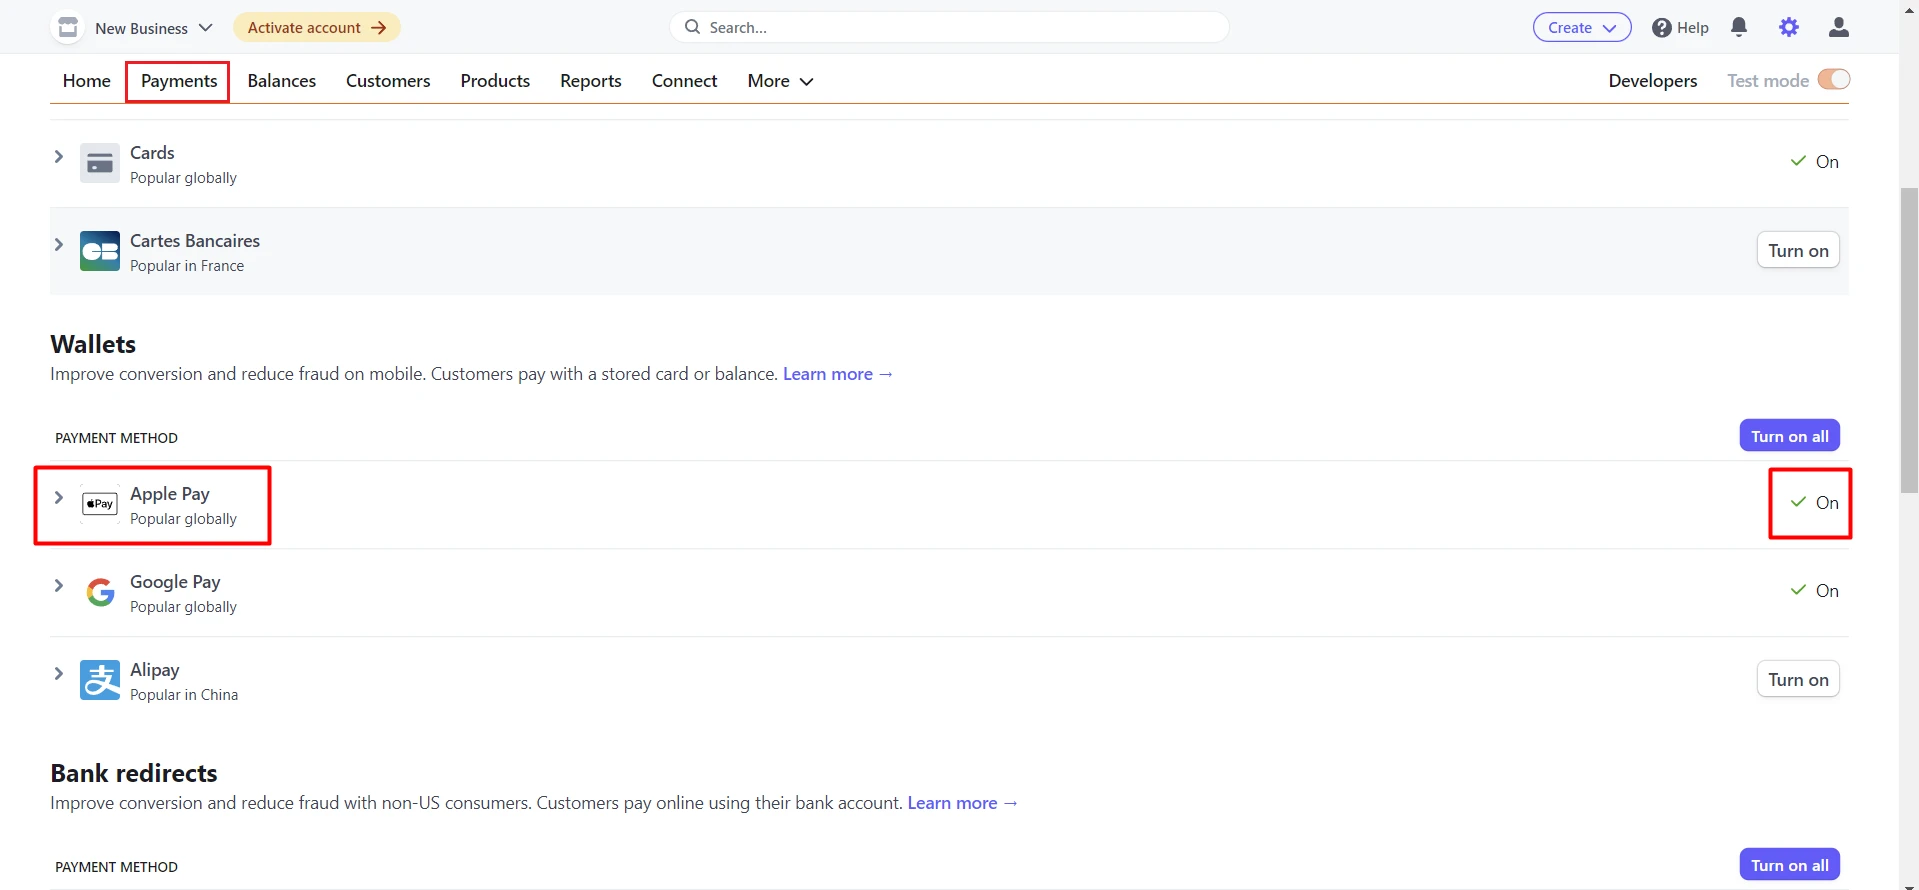
4. Click on “Register Domain” to link your WooCommerce store with Apple Pay.
5. Enter your website’s domain name (e.g., yourstore.com) and submit it for verification.
6. Stripe will automatically verify your domain, ensuring that Apple Pay transactions can be securely processed on your WooCommerce site.
Once verified, Apple Pay is officially active on your WooCommerce store! Your customers can now use it as a payment option at checkout.
Step 4: Test Apple Pay on Your Store
Before announcing Stripe Apple Pay on WooCommerce as a payment method, it’s essential to run a test transaction to confirm everything is working correctly. Here’s how:
1. Open your website on Safari, this could be on an iPhone, iPad, or Mac. Apple Pay only works on Apple devices with Safari.
2. Add a product to your cart and proceed to checkout.
3. If Apple Pay is set up correctly, you will see a “Buy with Apple Pay” button at checkout.
4. Click the Apple Pay button and complete a test transaction using a valid Apple Pay account linked to a credit or debit card.
Once the payment is successfully processed, you can be confident that Stripe Apple Pay on WooCommerce Store is fully functional. If you don’t see the Apple Pay button, check the troubleshooting section below.
By following these steps, you’ll successfully integrate Stripe Apple Pay on WooCommerce Store, providing customers with a smooth one-tap checkout experience. This not only enhances user experience but also reduces cart abandonment and boosts conversion rates.
Troubleshooting Common Apple Pay Issues in WooCommerce
If Stripe Apple Pay on WooCommerce isn’t showing up or working properly, don’t worry, you’re not alone. Many store owners face minor hiccups during setup. Below are some common Apple Pay issues and step-by-step solutions to get everything running smoothly.
1. Apple Pay Not Showing in WooCommerce
So, you’ve set up Stripe, enabled Apple Pay, and expect it to appear at checkout, but it’s nowhere to be seen? Here’s what might be causing the problem and how to fix it:
1. Double-check your Stripe API keys - Ensure you have correctly copied and pasted the Live Publishable Key and Live Secret Key from your Stripe dashboard into WooCommerce. Using test keys in live mode will prevent Apple Pay from appearing.
2. Apple Pay only works in Safari - If you're testing on Chrome, Firefox, or Edge, you won’t see the Apple Pay option. It only appears in Safari on Apple devices (iPhone, iPad, or Mac). Try switching to Safari for testing.
3. Your site must have a valid SSL certificate - Apple Pay requires a secure connection (HTTPS) to function. If your site is still running on HTTP, install an SSL certificate. You can check if your SSL is active by visiting your website. If there’s a padlock icon in the address bar, you’re good to go.
4. Your domain must be registered and verified in Stripe - Apple Pay requires domain verification before it works. Log in to your Stripe dashboard and ensure that your domain is correctly registered under Settings > Payment Methods > Apple Pay.
2. Stripe Apple Pay Domain Verification Failed
If you’re trying to verify your domain in Stripe but it keeps failing, follow these steps to resolve the issue:
1. Try re-registering your domain - Sometimes, reattempting the process helps. Go to Stripe Dashboard > Apple Pay and remove your existing domain registration. Then, try adding it again.
2. Make sure your site is HTTPS-enabled - Stripe won’t verify a domain that isn’t secure. Check that your SSL certificate is active and properly configured.
3. Manually upload the Apple verification file - Stripe requires a specific file called apple-developer-merchantid-domain-association to be placed on your server.
Here’s how to do it:
● Download the file from your Stripe account.
● Use FTP or File Manager in your hosting panel to upload the file to:
● yourwebsite.com/.well-known/apple-developer-merchantid-domain-association
● Once uploaded, visit the file’s URL in your browser (e.g., https://yourwebsite.com/.well-known/apple-developer-merchantid-domain-association). If the file loads without errors, Stripe should now verify your domain successfully.
3. Apple Pay Button Not Appearing at Checkout
If Apple Pay is enabled but the button isn’t showing at checkout, here’s what to check:
1. Confirm that Apple Pay is enabled in Stripe settings - Log into your Stripe account, go to Settings > Payment Methods, and make sure Apple Pay is turned on.
2. Ensure Payment Request Buttons are activated in WooCommerce - WooCommerce has an option called Payment Request Buttons under WooCommerce > Settings > Payments > Stripe. This setting must be enabled for the Apple Pay button to appear at checkout.
3. Test on an actual Apple device - The Apple Pay button will only show up for users who have Apple Pay set up on their device. If you're testing on a Windows PC or an Android phone, you won’t see the option. Instead, use an iPhone, iPad, or Mac that has a linked Apple Pay account with a valid card.
Setting up Apple Pay in WooCommerce via Stripe is usually easy, but small misconfigurations can cause issues. By following the steps above, you should be able to resolve any problems and ensure a smooth Apple Pay checkout experience for your customers.
If you’re still facing issues, it might be worth reaching out to Stripe support or checking your WooCommerce and Stripe plugin versions to make sure everything is up to date.
Why Enable Apple Pay on WooCommerce?
If you are new to Apple Pay, you must consider the following factors before using it.
1. Boost Conversions with Faster Checkout
According to a 2024 Baymard Institute study, the average cart abandonment rate is 69.82%. One of the top reasons is the complicated checkout process. Apple Pay allows users to complete their purchases in seconds with Face ID or Touch ID, eliminating the need to enter billing and shipping details manually.
2. Improve Mobile Shopping Experience
With mobile eCommerce sales expected to hit $4.5 trillion by 2025, ensuring a smooth checkout experience on mobile devices is important. Apple Pay is natively integrated into iPhones, iPads, and Macs, making it one of the easiest payment methods for mobile shoppers.
3. Increased Security and Trust
Apple Pay uses tokenization technology, meaning card details are never stored or shared. This not only enhances security but also builds customer trust, leading to higher retention and repeat purchases.
4. No Additional Transaction Fees
Unlike other payment processors, Apple Pay does not charge additional transaction fees beyond what Stripe charges (usually 2.9% + 30¢ per transaction in the U.S.).
Conclusion:
Setting up Stripe Apple Pay on your WooCommerce store can be a game-changer for your business. It makes checkout faster, more secure, and incredibly convenient, exactly what today’s online shoppers expect.
With Apple Pay, your customers can skip the hassle of entering card details and complete their purchase with just a tap. This not only reduces cart abandonment but also improves conversion rates. If you’ve followed this guide, your store should now be ready to offer a smooth, one-click checkout experience.
Still running into issues? Double-check your Stripe settings, WooCommerce version, and device compatibility to ensure everything runs smoothly. A seamless payment process builds trust and loyalty, keeping your business ahead of the competition.
Looking to upgrade your WooCommerce store even further? At Rasonix, we specialize in custom eCommerce services, payment gateway integration, and high-performance WooCommerce development. Whether you need help with troubleshooting or a complete store setup, we’ve got you covered!
Let’s create a high-converting online store together! Get in touch with Rasonix today!